1. In the Login Panel of Linkedomata, enter the Username and Password for the LinkedIn Account you wish to use and click on Login. After entering Username and Password click on Save Login Info to select credentials from the dropdown.
2. After you click Login, the tool will open a Chrome Browser Window where LinkedIn login page will be opened and your credentials will be filled automatically. Finally, you will land on your home page of LinkedIn.
3. After successfully landing on the home page, a new Linkedomata Window will open that will show you all the various options / activities which you can automate using Linkedomata.
4. The tool has 4 main functionalities –
a. Manage Connection Request
b. Sending Messages to First Degree Connections
c. Extracting Details
d. Tagging Connections (Sales Navigator)
5. This tool is very intuitive to use and allows users to fill their search parameters, for sending connection requests or messages or extracting details, directly in the LinkedIn Page opened by the tool and fetch the search results.
6. Then fill all the parameters required in the Left side panel of Linkedomata tool and then click on Start Button. You can also pause the tool anytime in between, change the parameters and then click continue. You can easily download the Log created in the right hand side by clicking on Copy to Clipboard / Export to Excel.
Linkedin Automate – Sending Connection Requests
Linkedomata automates the process of sending connection Requests for the Search Results fetched from the Basic LinkedIn Search Panel, From Sales Navigator Search Panel and by Uploading URLs / LinkedIn Ids.
From Search Panel
1. Select the Option of Sending Connection Request from Search Panel and wait till the Search Panel page is loaded in.
2. Once the Search panel page is loaded, fill In the Search Parameters like Title, First Name, Last Name, Location, Company etc. directly in the LinkedIn Page opened by Linkedomata.
3. Then enter the Parameters in Linkedomata like –
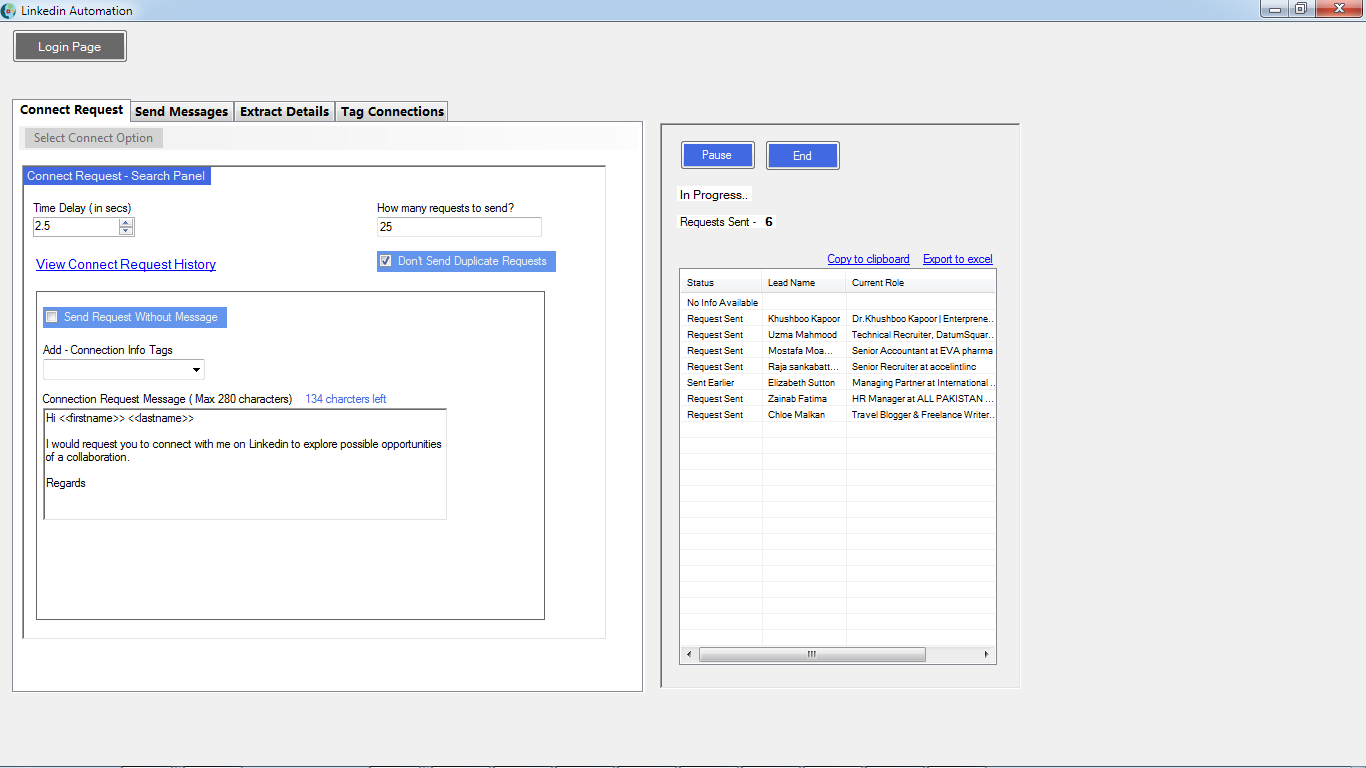
a. Time delay (time difference between 2 requests).
b. How many requests you wish to send in one go (keep this number around 100-150 per day). Select the checkbox "Don't send Duplicate requests" to avoid sending connection requests to the same people again.
c. If you wish to send request with a default message then select the checkbox that says "Send Request without Message" or else enter the text message.
d. If you wish to enter a custom message then please note that with Linkedomata you can also add the first name, last name, job title in the message to personalize it. Select the "Add Connection Info Tags" dropdown and it will add a header to the text content.
4. Click Start Button on the Top Right Section after filling in the parameters.
From Sales Navigator
1. Select the Option of Sending Connection Request from Sales Navigator and wait till the Sales Navigator page is loaded in LinkedIn. Then set your search / audience to whom you wish to send connection request.
2. Then enter the Parameters in Linkedomata like –
a. Time delay (time difference between 2 requests).
b. How many requests you wish to send in one go (keep this number around 100-150 per day)Select the checkbox "Don't send Duplicate requests" to avoid sending connection requests to the same people again.
c. If you wish to send request with a default message then select the checkbox that says "Send Request without Message" or else enter the text message.
d. If you wish to enter a custom message then please note that with Linkedomata you can also add the first name, last name, job title in the message to personalize it. Select the "Add Connection Info Tags" dropdown and it will add a header to the text content.
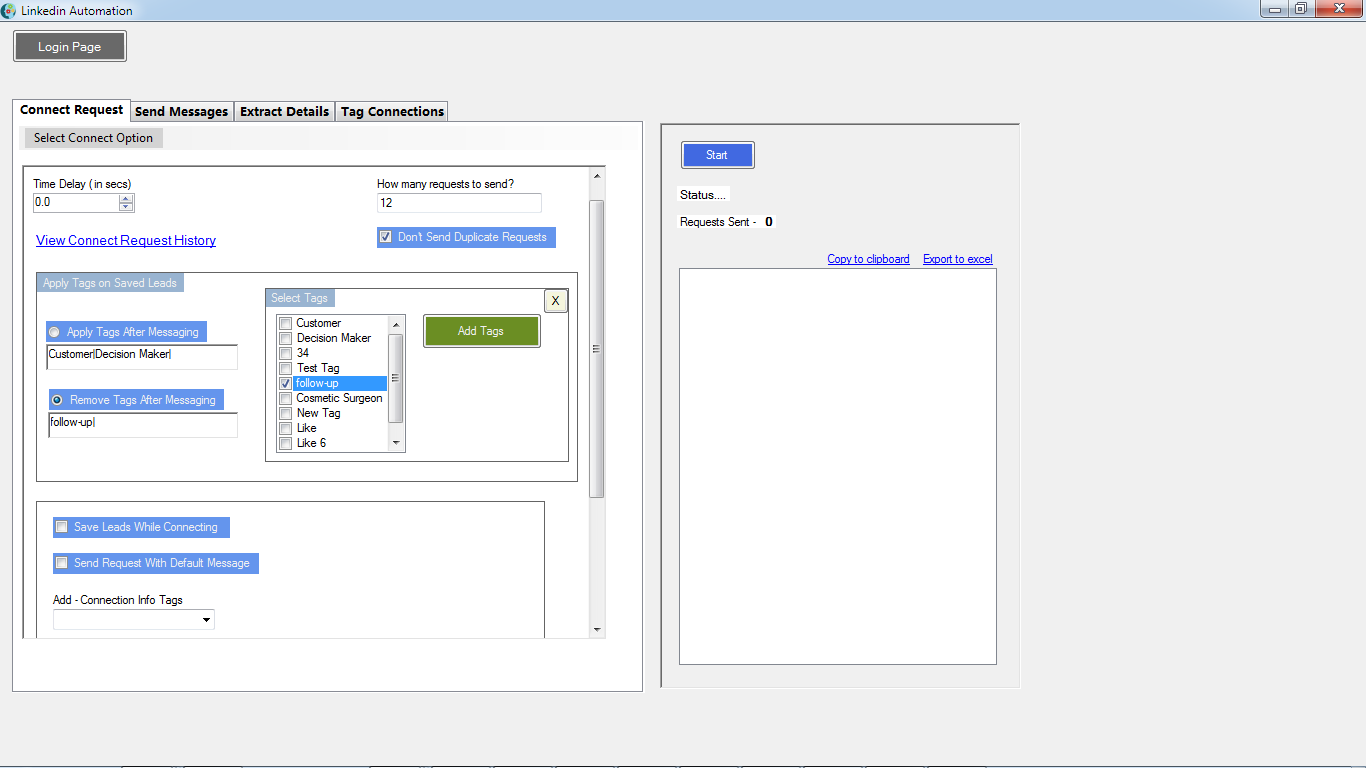
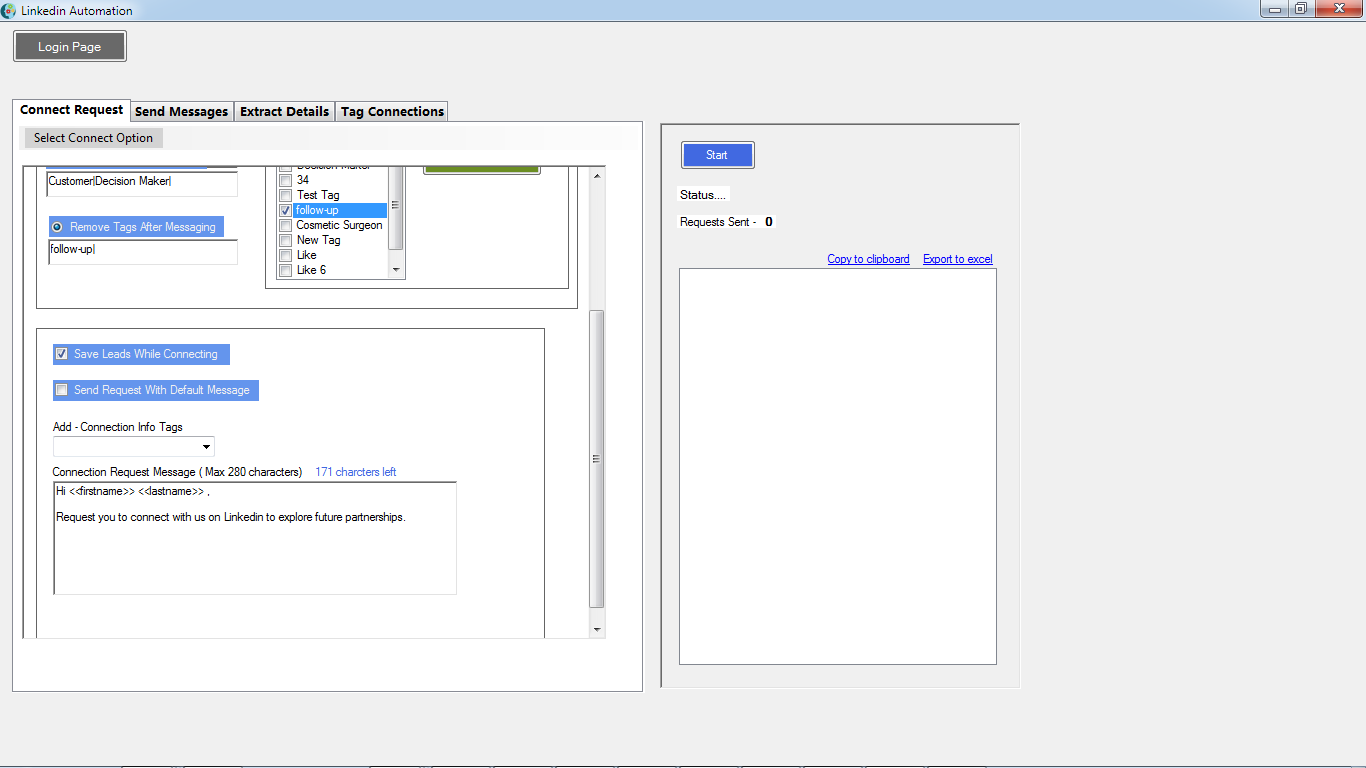
e. If you also wish to Save Connection as a lead, then select the checkbox "Save Leads While Connecting".
f. You can also Apply Tags / Remove Tags for already saved leads. Before using this option make sure that you have pre-selected the Saved Leads.
3. Click Start Button on the Top Right Section after filling in the parameters.
Upload List of LinkedIn Ids –
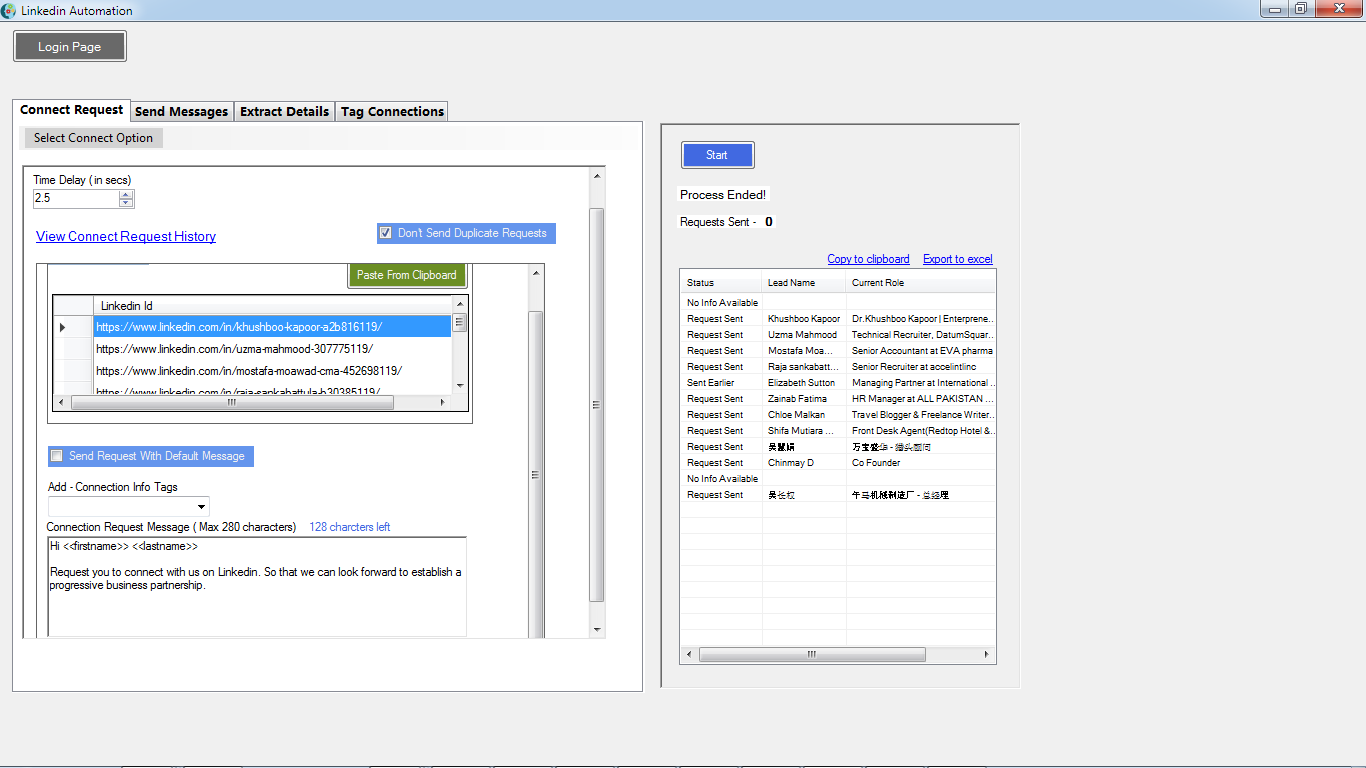
1. Select the Option of "Upload List of LinkedIn Ids".
2. Copy a list of LinkedIn Ids and then click on Paste from Clipboard.
3. Click Start Button on the Top Right Section after filling in the parameters.
4. The tool permits to view the history of connection requests sent directly on the Linkedomata window. Click on the option "View Connect request history" in the window to view the same.
Linkedin Automate – Sending Messages to 1st Degree Connections
Linkedomata automates the process of sending messages to your first degree connections for the Search Results fetched from the Basic LinkedIn Search Panel, From Sales Navigator Search Panel, and From Connections Page and by Uploading URLs / LinkedIn Ids.
From Search Panel
1. Select the Option of Sending Messages from Search Panel and wait till the Search Panel page is loaded in.
2. Once the Search panel page is loaded, fill In the Search Parameters like Title, First Name, Last Name, Location, Company etc. directly in the LinkedIn Page opened by Linkedomata.
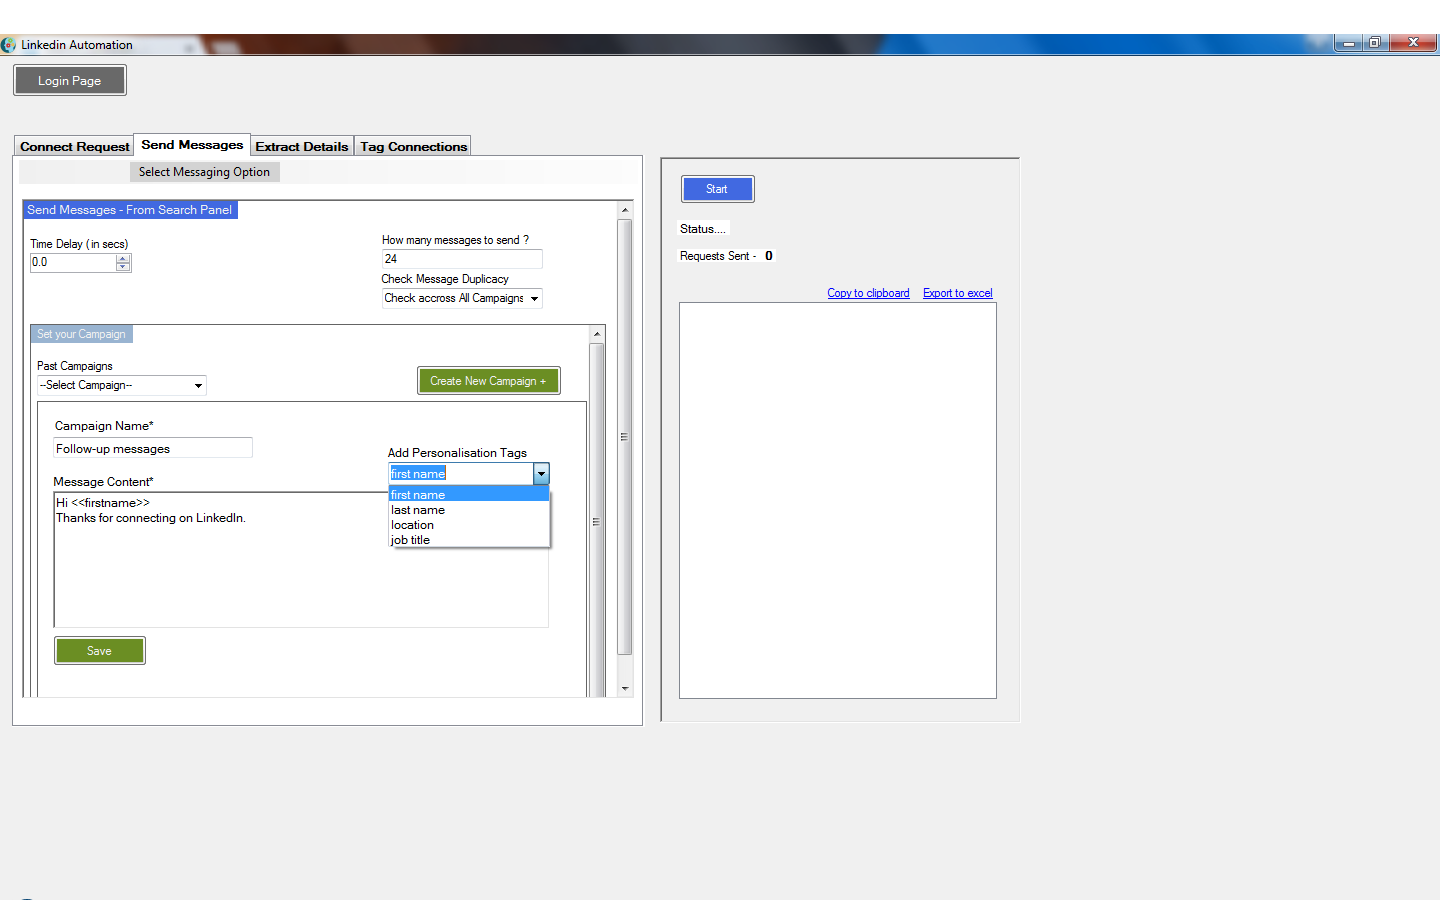
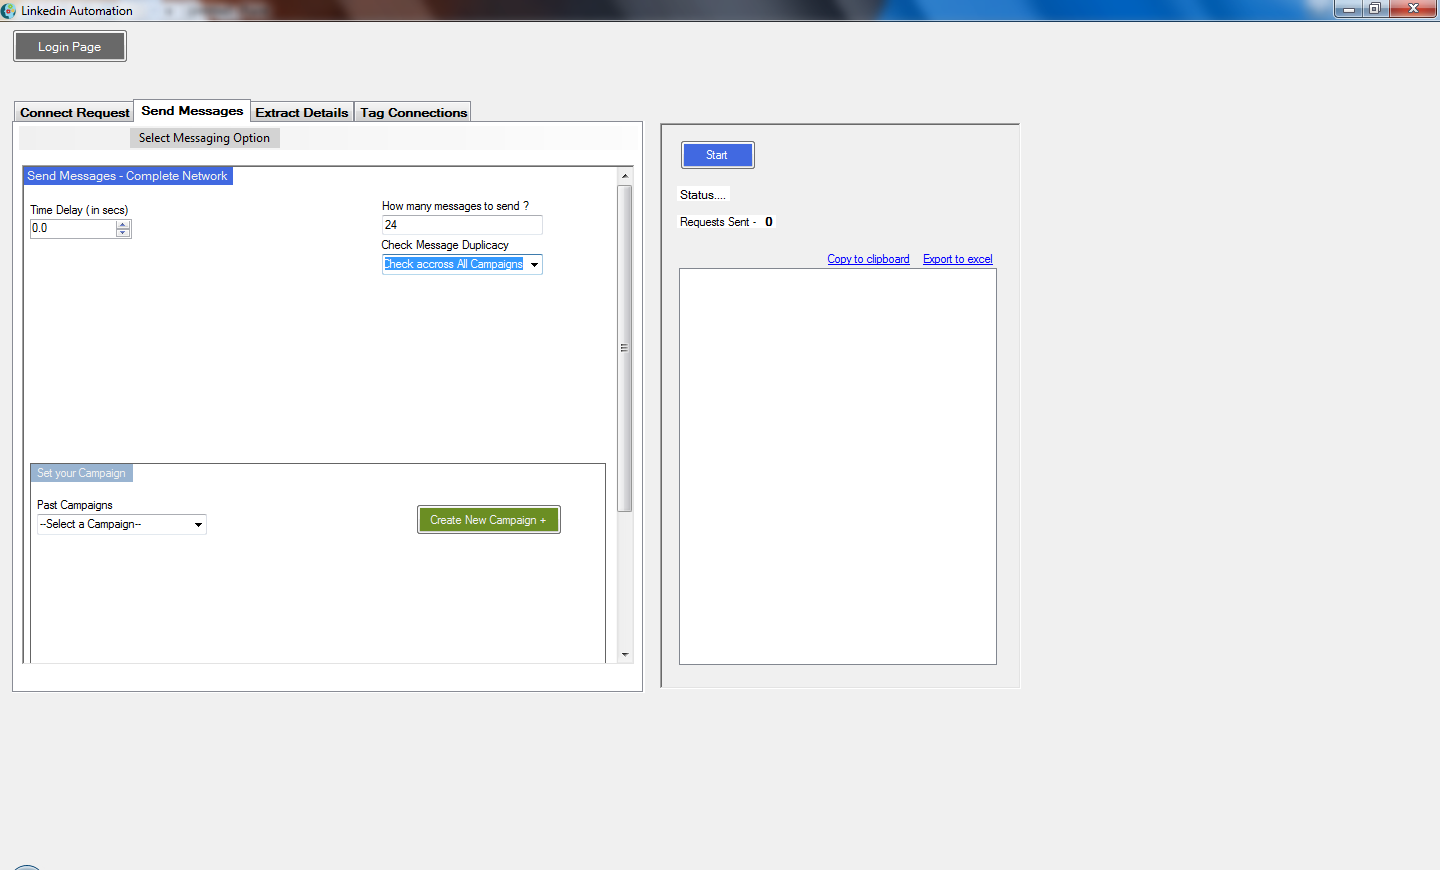
3. Then fill the parameters in Linkedomata:
a. Time delay ( time difference between two messages)
b. How many messages you wish to send in one go (keep this number around100-150 per day).Select the checkbox "Don't repeat message if sent earlier" to avoid sending same campaign twice to your first degree connections.
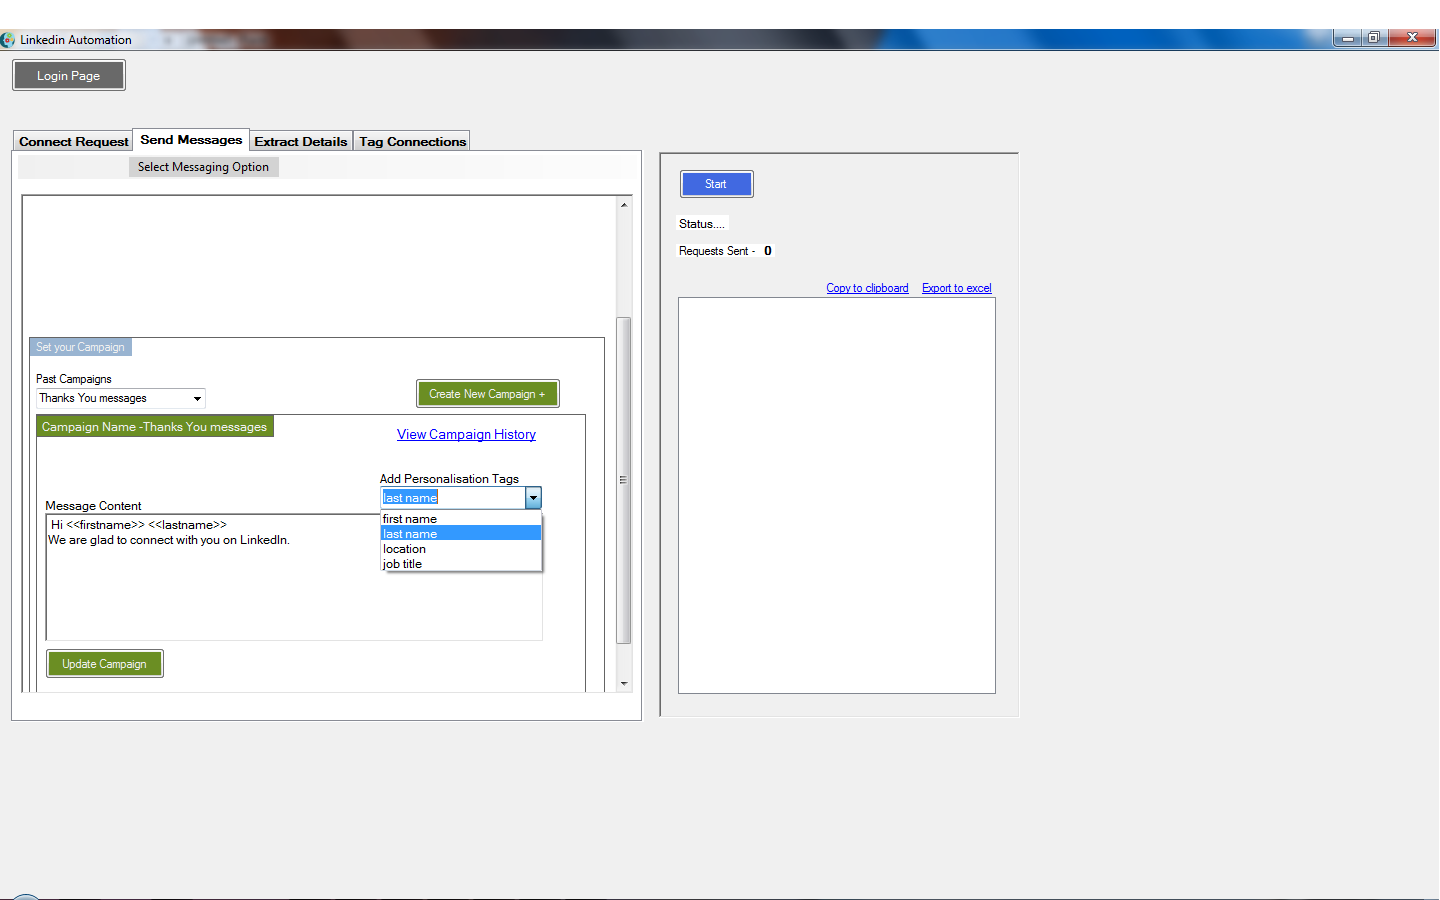
c. You can either select an existing Campaign message or create a new one. History is also maintained for each campaign which can be viewed by clicking on "View Campaign History" link.
d. If you are creating a new campaign or updating the existing ones then please don't forget to Save / Update them before you start your campaign.
e. If you wish to enter a personalized message then please note that with Linkedomata you can also add the first name, last name, job title in the message to personalize it. Select the "Add Personalsation Tags" dropdown and it will add a header to the text content.
4. Click Start Button on the Top Right Section after filling in the parameters.
Upload List of LinkedIn Ids
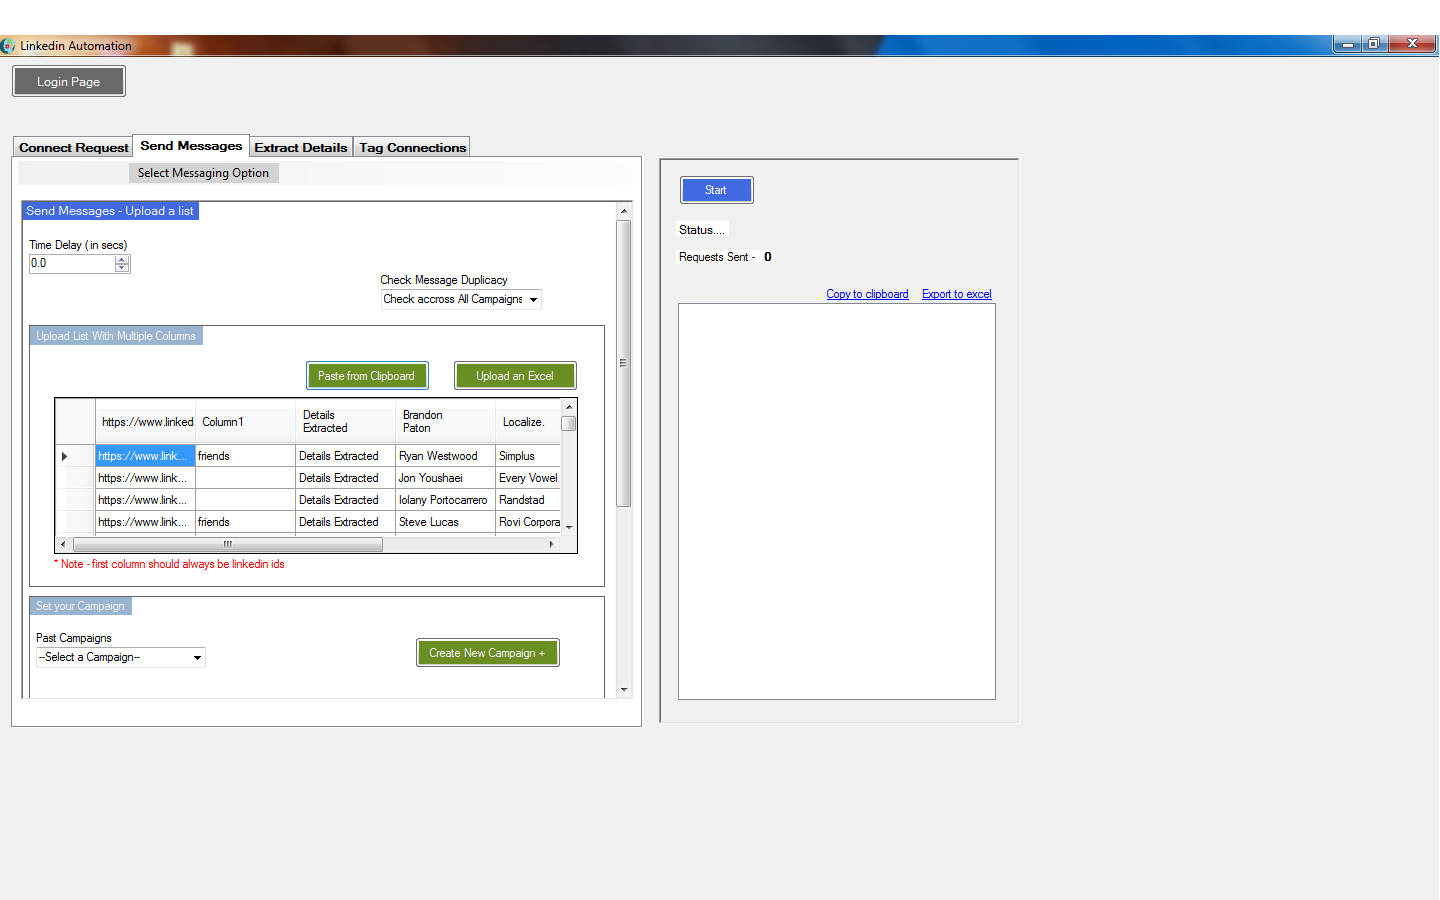
This option allows you to upload a complete list of Excel Fields with multiple columns for each LinkedIn connection. Just like mail merge you can import and merge the data in these columns directly into the message content to personalize messages even further and achieve a better response rate.
1. Select the Option of "Upload Custom list".
2. Copy a list of columns from an Excel including the LinkedIn Ids. Make sure that the first column should always be LinkedIn Ids. You can upload an Excel directly or select columns from Excel and paste it directly in the tool by clicking on "Copy from Clipboard".
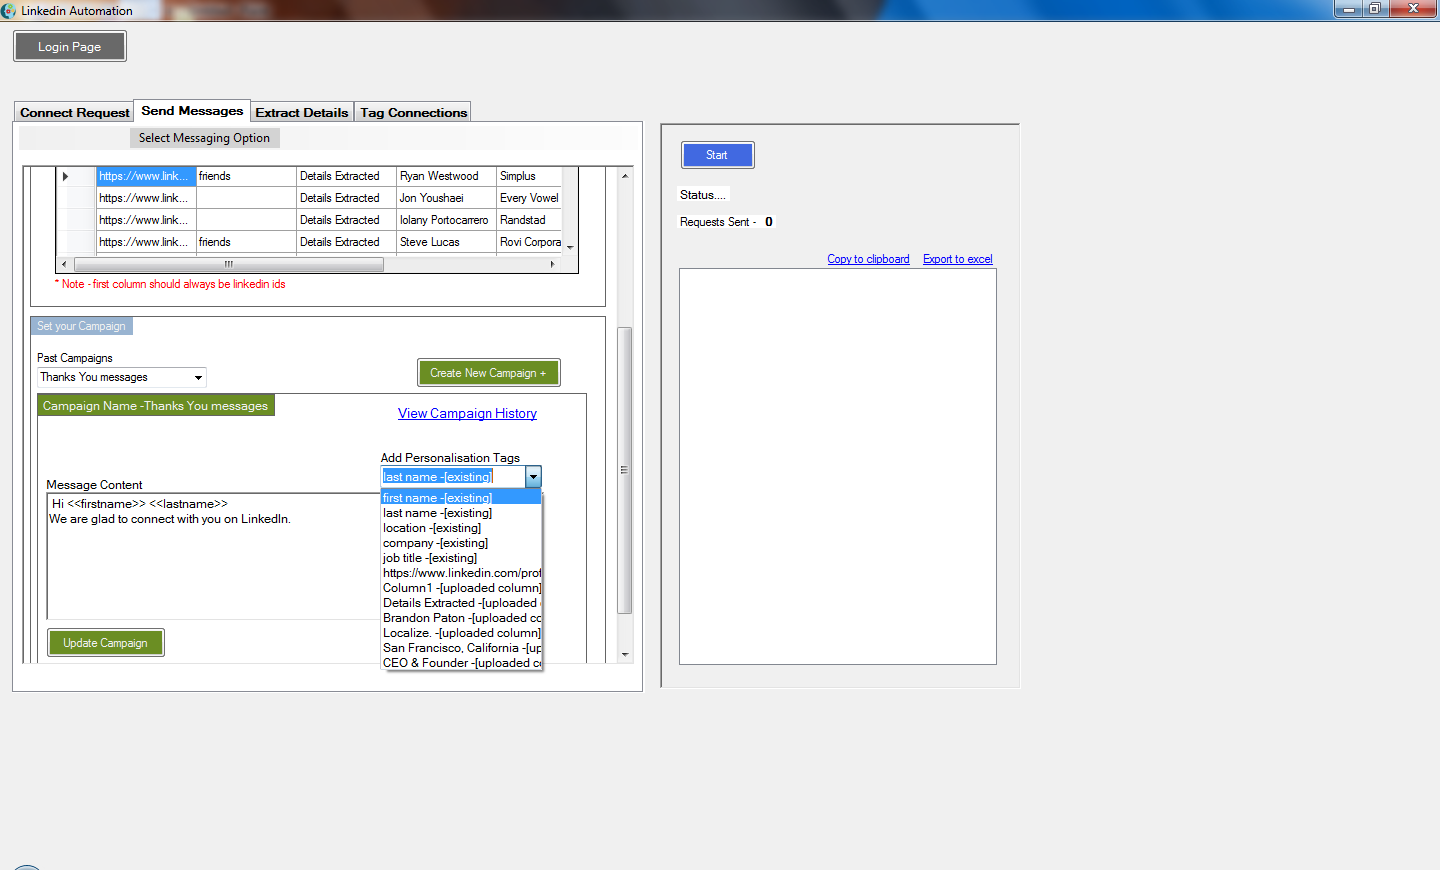
3. Just like in other Send Message Options, here also you can create a New Campaign or select an existing one. All the merge identifiers (for columns added along with LinkedIn Ids) can be selected from Add Personalization Tags combo box.
4. Click Start Button on the Top Right Section after filling in the parameters.
From Sales Navigator
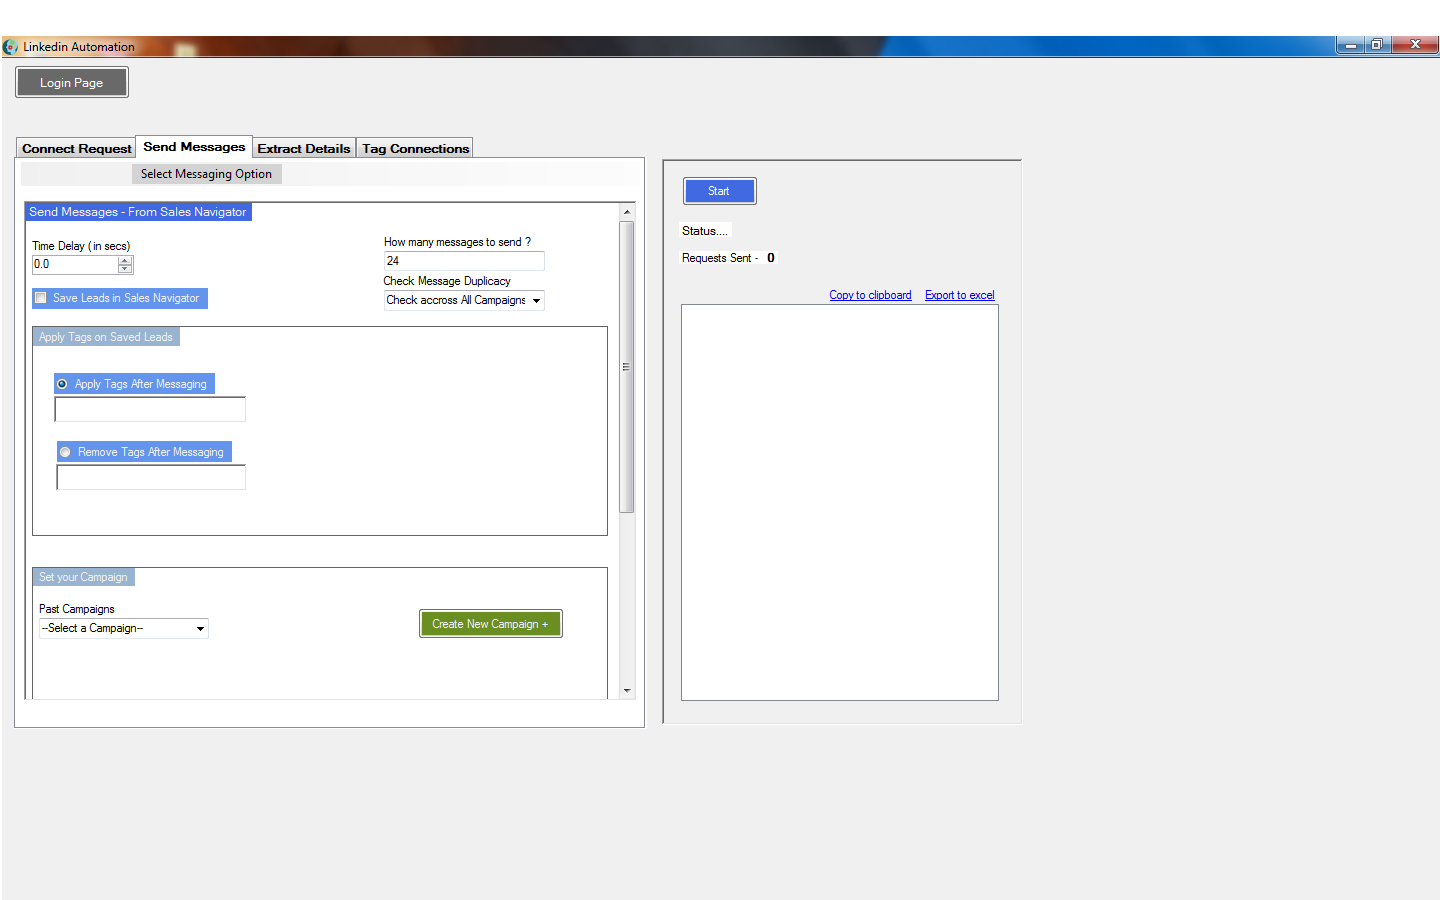
1. Select the Option of Sending Messages from Sales Navigator and wait till the Sales Navigator page is loaded in LinkedIn. Then set your search / audience to whom you wish to send the messages.
2. Then enter the Parameters in Linkedomata like:
a. Time delay (time difference between 2 requests).
b. How many messages you wish to send in one go (keep this number around100-150 per day).Select the checkbox "Don't repeat message if sent earlier" to avoid sending same campaign twice to your first degree connections.
c. You can either select an existing Campaign message or create a new one. History is also maintained for each campaign which can be viewed by clicking on "View Campaign History" link.
d. If you are creating a new campaign or updating the existing ones then please don't forget to Save / Update them before you start your campaign.
e. If you wish to enter a personalized message then please note that with Linkedomata you can also add the first name, last name, job title in the message to personalize it. Select the "Add Personalsation Tags" dropdown and it will add a header to the text content.
f. If you also wish to Save the lead in the Sales Navigator, then select the checkbox "Save Leads in Sales Navigator".
g. You can also Apply Tags / Remove Tags on Saved Leads. Before using this option make sure that you have pre-selected your Saved Leads.
3. Click Start Button on the Top Right Section after filling in the parameters.
From My Network / Connections Page
This section allows you to send messages to all your first degree connections. Your most recently added connections will show on top. So if you wish to send an introductory message then this is the best and fastest way of doing so.
1. Select the Option of Sending Messages from Connections Page and wait till the Connections page is loaded in LinkedIn.
2. Then enter the Parameters in Linkedomata like:
a. Time delay ( time difference between two messages)
b. How many messages you wish to send in one go (keep this number around100-150 per day). Select the checkbox "Don't repeat message if sent earlier" to avoid sending same campaign twice to your first degree connections.
c. You can either select an existing Campaign message or create a new one. History is also maintained for each campaign which can be viewed by clicking on "View Campaign History" link.
d. If you are creating a new campaign or updating the existing ones then please don't forget to Save / Update them before you start your campaign.
e. If you wish to enter a personalized message then please note that with Linkedomata you can also add the first name, last name, job title in the message to personalize it. Select the 'Add Personalsation Tags' dropdown and it will add a header to the text content.
3. Click Start Button on the Top Right Section after filling in the parameters.
Linkedin Automate – Extracting Details of your LinkedIn connections
Linkedomata automates the process of extracting the details of your first and second degree LinkedIn connections for the Search Results fetched from the Basic LinkedIn Search Panel, From Sales Navigator Search Panel, fromAll Network Page or by Uploading URLs / LinkedIn Ids.
From Search Panel
With Linkedomata you can either extract the basic information or full information of your first and second degree LinkedIn connections. The basic information includes the relation (1st or 2nd), name, location, current role of the person, his LinkedIn Id and whether he is a premium account holder on LinkedIn or not.
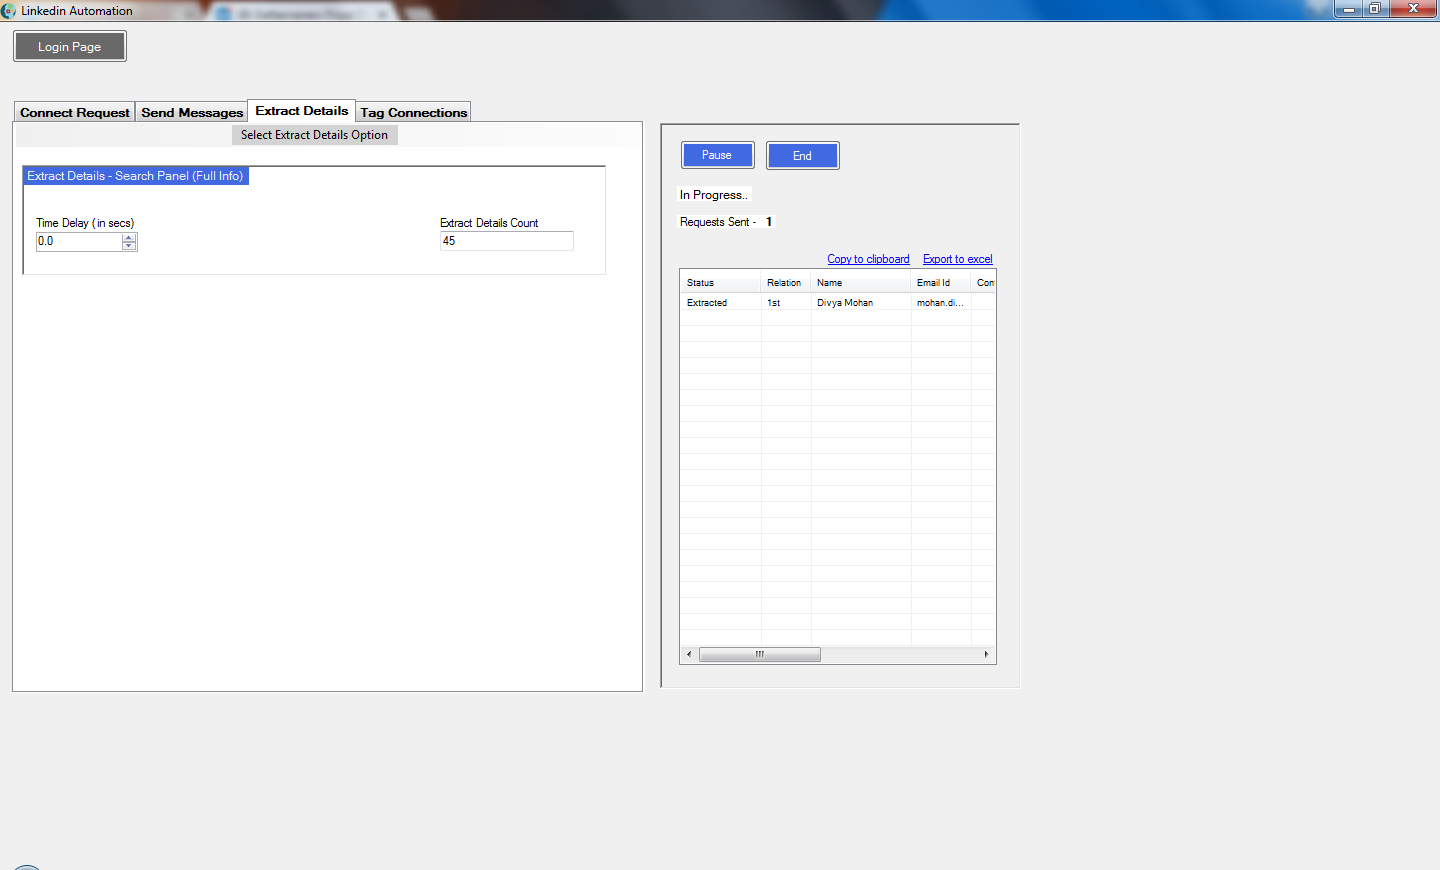
Similarly, the full information of your LinkedIn connection includes the mail-id, contact number and company name of the person in addition to the above details. However, contact details will be extracted only if the connection has mentioned it in his LinkedIn profile. For extracting full information of a contact Linkedomata visits the page also.
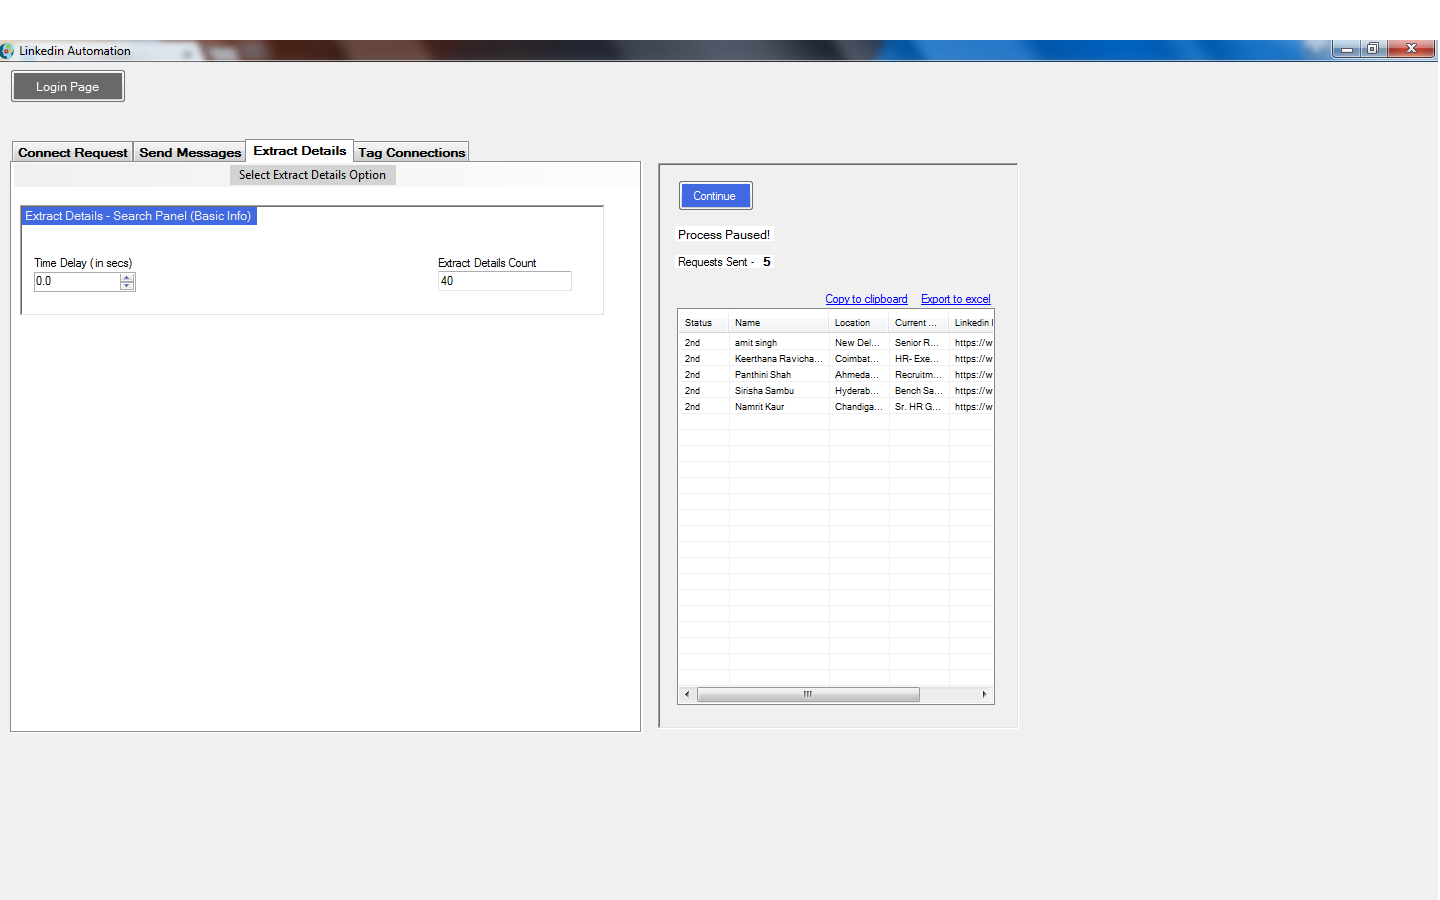
For Basic Info
1. Select the option of Extract Details from Search Panel – Basic Info and wait till the Search Panel page is loaded in.
2. Once the Search panel page is loaded, fill In the Search Parameters like Title, First Name, Last Name, Location, Company etc. directly in the LinkedIn Page opened by Linkedomata.
3. Then enter the Parameters in Linkedomata like:
a. Time Delay ( time difference between two details extracted)
b. The number of connections whose details you wish to extract in one go.
4. Click Start Button on the Top Right Section after filling in the parameters.
5. The details extracted of your LinkedIn connections are visible in the Right Section of Linkedomata. You can copy these details into an Excel file by either clicking on Copy to Clipboard and pasting on an Excel file or directly clicking on Export to Excel.
For Full Info
1. Select the option of Extract Details from Search Panel – Full Info and wait till the Search Panel page is loaded in.
2. Once the Search panel page is loaded, fill In the Search Parameters like Title, First Name, Last Name, Location, Company etc. directly in the LinkedIn Page opened by Linkedomata.
3. Then enter the Parameters in Linkedomata like:
a. Time Delay ( time difference between two details extracted)
b. The number of connections whose details you wish to extract in one go.
4. Click Start Button on the Top Right Section after filling in the parameters.
5. The details extracted of your LinkedIn connections are visible in the Right Section of Linkedomata. You can copy these details into an Excel file by either clicking on Copy to Clipboard and pasting on an Excel file or directly clicking on Export to Excel.
From Sales Navigator
Just like From the Search Panel page, you can extract the basic as well as full information of your LinkedIn connections with search results fetched from the Sales navigator page.
For Basic Info
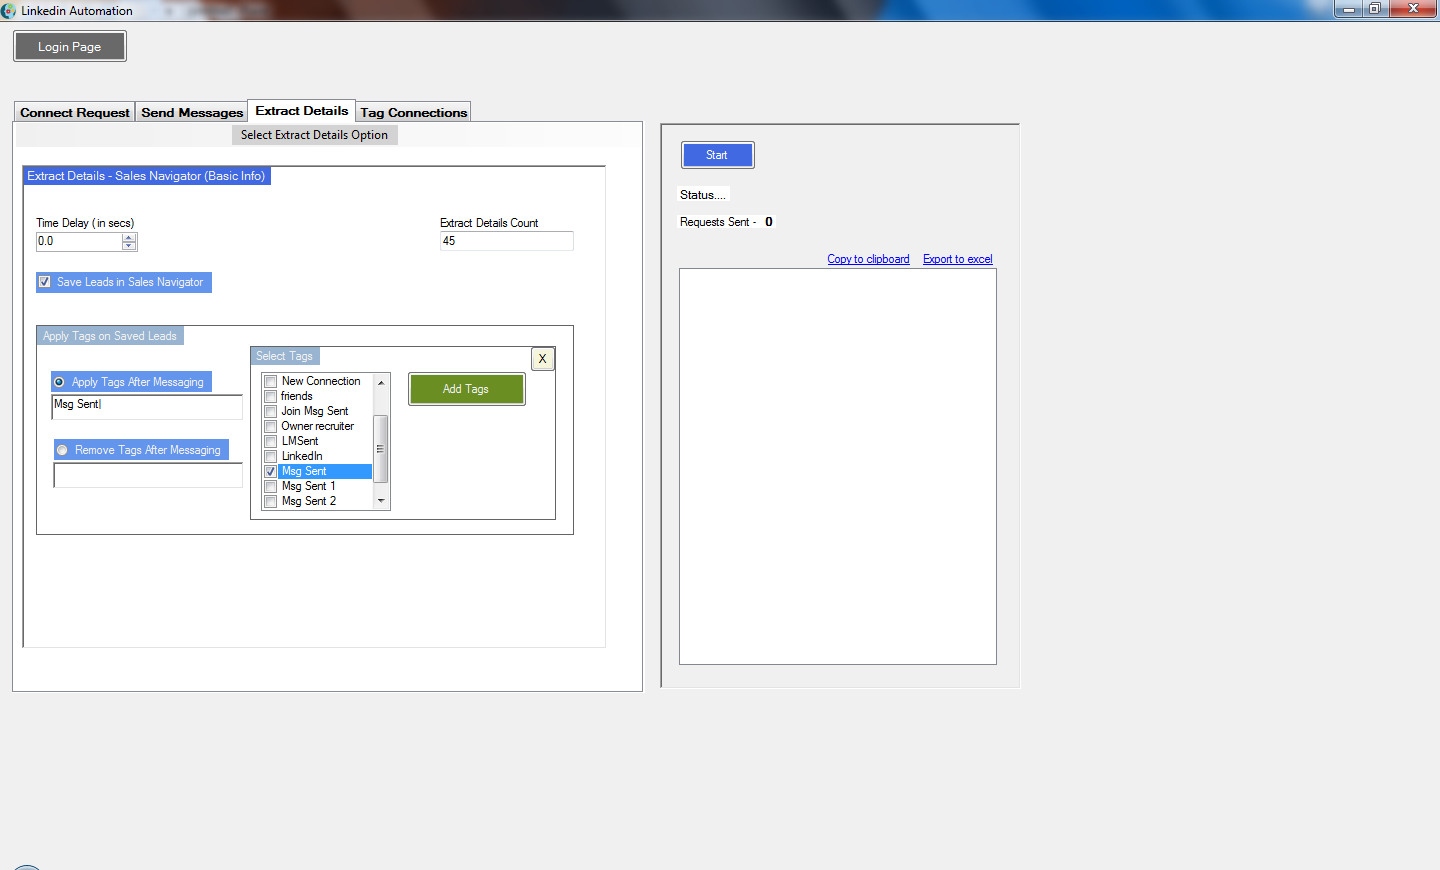
1. Select the Option of Extract Details from Sales Navigator – Basic Info and wait till the Sales Navigator page is loaded in LinkedIn. Then set your search / audience to whom you wish to send the messages.
2. Then enter the Parameters in Linkedomata like:
a. Time delay (time difference between 2 details extracted).
b. The number of connections whose details you wish to extract in one go.
c. If you wish to Save the lead in the Sales Navigator, then select the checkbox "Save Leads in Sales Navigator".
d. You can also Apply Tags / Remove Tags on Saved Leads. Before using this option make sure that you have pre-selected your Saved Leads.
3. Click Start Button on the Top Right Section after filling in the parameters.
4. The details extracted of your LinkedIn connections are visible in the Right Section of Linkedomata. You can copy these details into an Excel file by either clicking on Copy to Clipboard and pasting on an Excel file or directly clicking on Export to Excel.
For Full Info
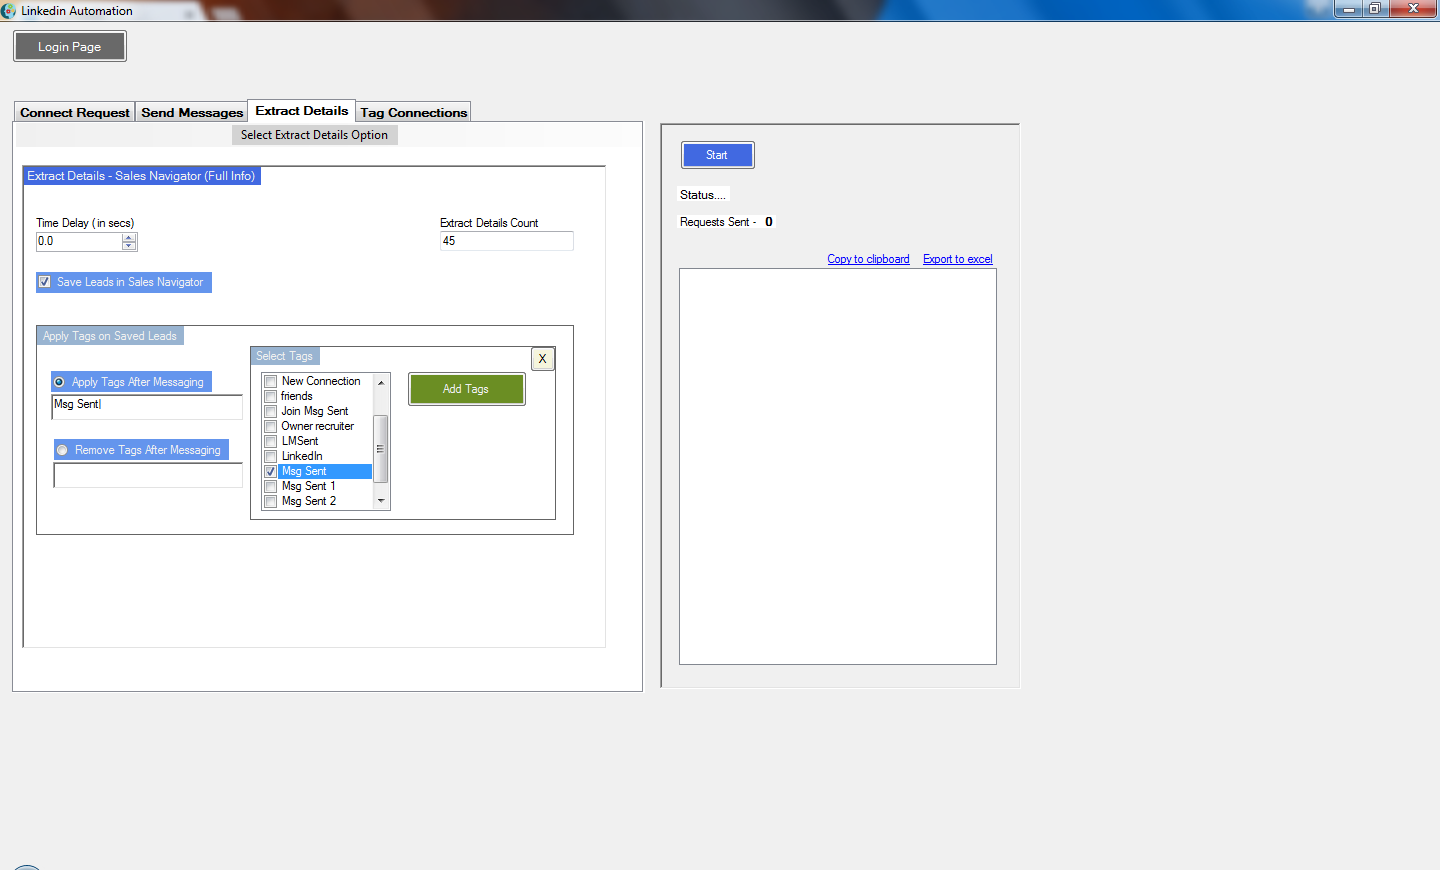
1. Select the Option of Extract Details from Sales Navigator – Full Info and wait till the Sales Navigator page is loaded in LinkedIn. Then set your search / audience to whom you wish to send the messages.
2. Then enter the Parameters in Linkedomata like:
a. Time delay (time difference between 2 details extracted).
b. The number of connections whose details you wish to extract in one go.
c. If you wish to Save the lead in the Sales Navigator, then select the checkbox "Save Leads in Sales Navigator".
d. You can also Apply Tags / Remove Tags on Saved Leads. Before using this option make sure that you have pre-selected your Saved Leads.
3. Click Start Button on the Top Right Section after filling in the parameters.
4. The details extracted of your LinkedIn connections are visible in the Right Section of Linkedomata. You can copy these details into an Excel file by either clicking on Copy to Clipboard and pasting on an Excel file or directly clicking on Export to Excel.
From My Network / Connections Page
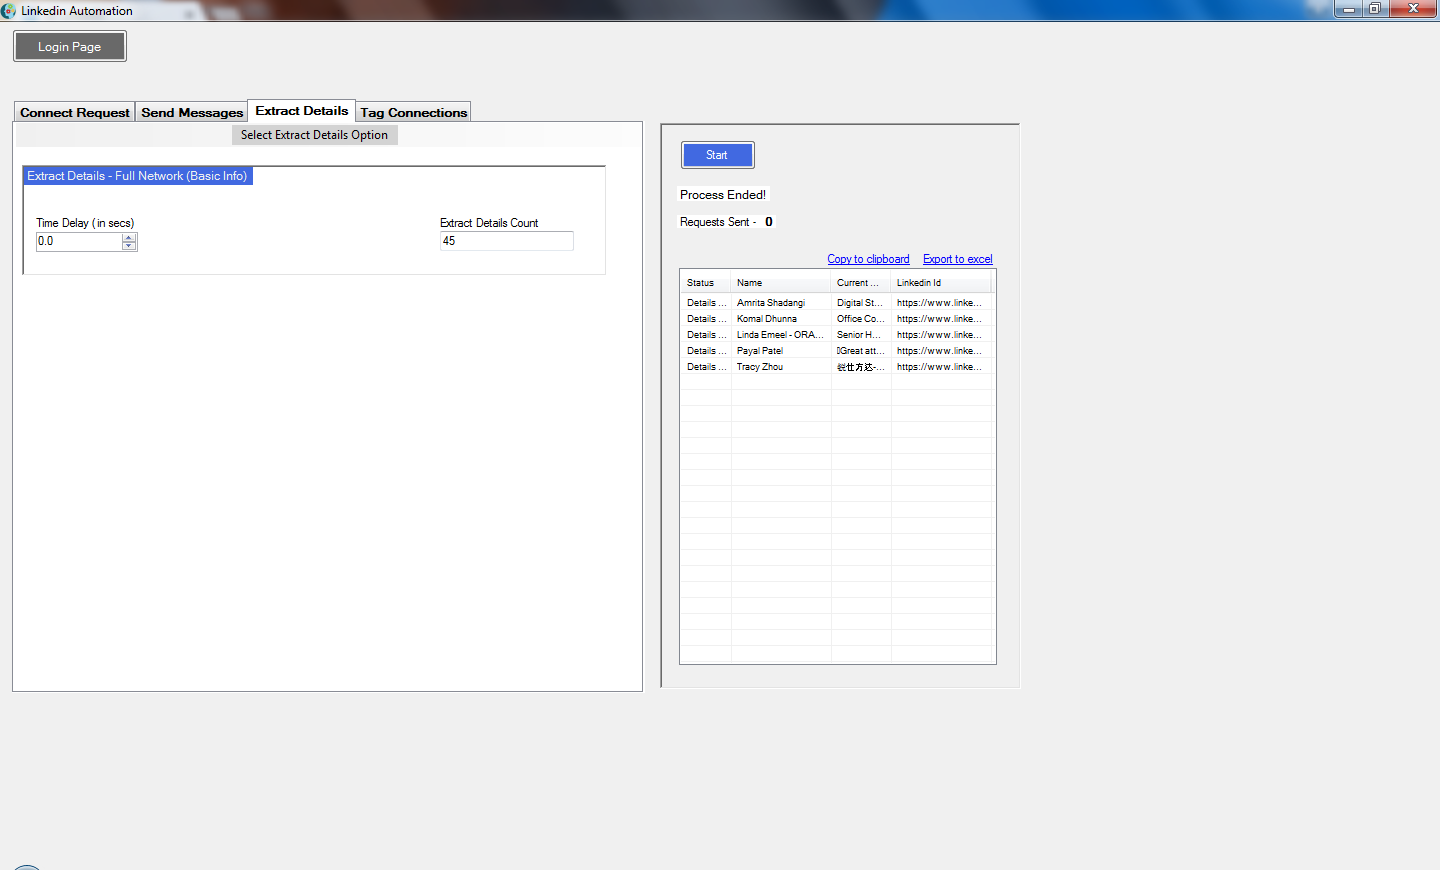
This section allows you to extract details like name, current role, and LinkedIn Ids of all your first degree connections. Your most recently added connections will show on top. So if you wish to send connection requests to these people with another LinkedIn account using the list of LinkedIn Ids, this is the fastest way of doing so.
1. Select the option of Extract Details from Connections Page – Full Network and wait till the Connections page is loaded in.
2. Then enter the Parameters in Linkedomata like:
a. Time Delay ( time difference between two details extracted)
b. The number of connections whose details you wish to extract in one go.
3. Click Start Button on the Top Right Section after filling in the parameters.
4. The details extracted of your LinkedIn connections are visible in the Right Section of Linkedomata. You can copy these details into an Excel file by either clicking on Copy to Clipboard and pasting on an Excel file or directly clicking on Export to Excel.
Upload List of LinkedIn Ids
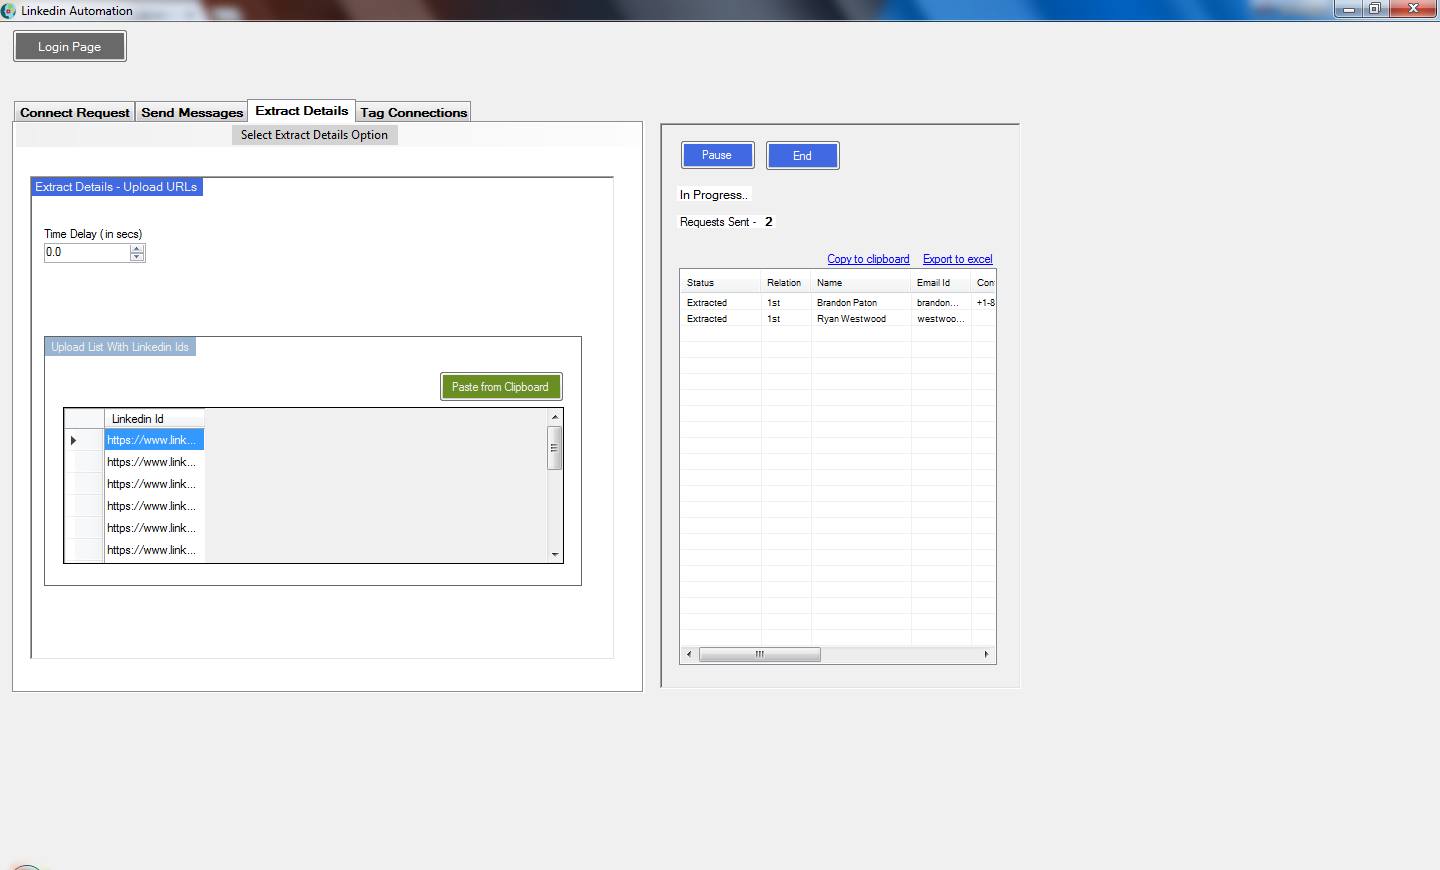
This section allows you to upload a list of LinkedIn Ids directly into the Linkedomata tool and extract the details of your connections like the relation (1st or 2nd degree), name, e-mail id, contact number, company name, location, his current role and whether he is a premium account holder or not.
1. Select the option of Upload LinkedIn Ids.
2. Copy a list of LinkedIn Ids and then click on Paste from Clipboard.
3. Enter the Time Delay ( time difference between two details extracted).
4. Click Start Button on the Top Right Section after filling in the parameters.
5. The details extracted of your LinkedIn connections are visible in the Right Section of Linkedomata. You can copy these details into an Excel file by either clicking on Copy to Clipboard and pasting on an Excel file or directly clicking on Export to Excel.
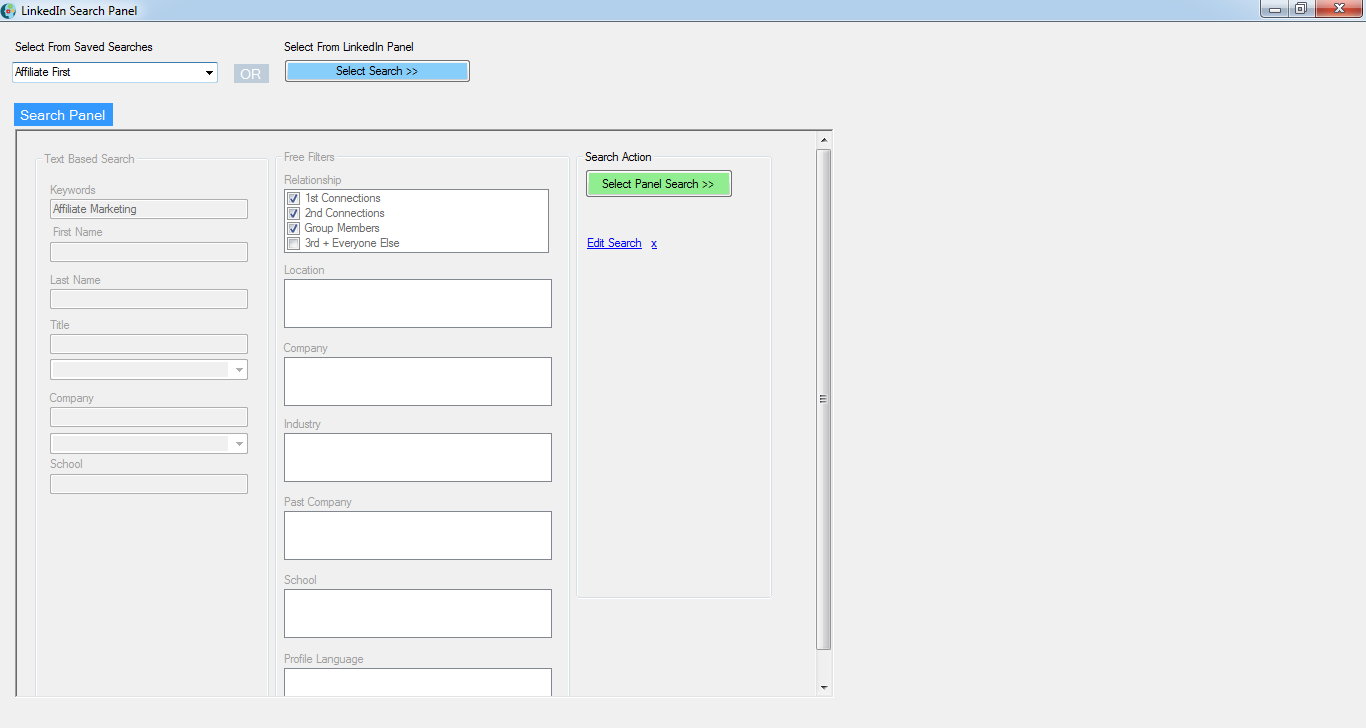
Linkedin Automate – Save and Export Multiple Linkedin Searches
Taking Linkedin automation to next level, Linkedomata comes with a feature to import Searches from Linkedin into Linkedomata and vice-versa.This solves a very critical problem for users who wish to use the same search pattern on regular basis.With just one button click the search which is filled in the Linkedin Advance search panel can be imported in linkedomata and from linkedomata it can be filled directly in the Linkedin search panel fields.
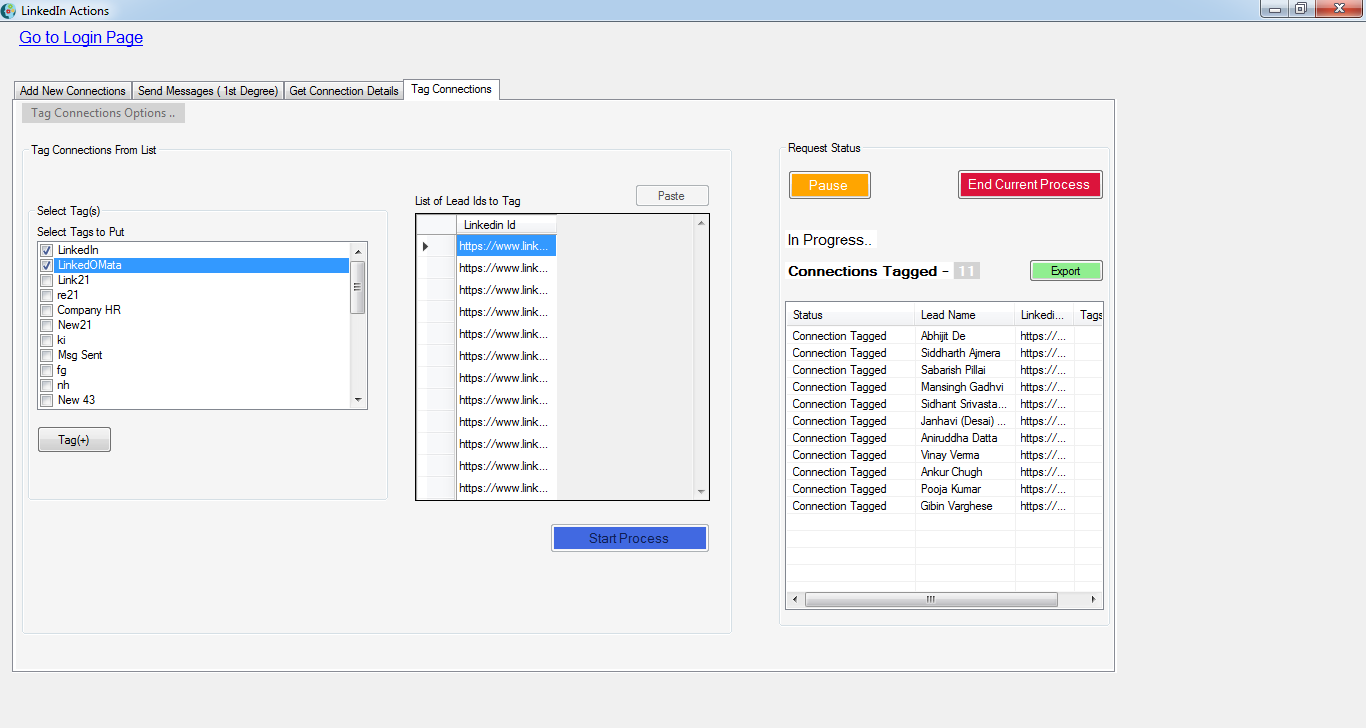
Linkedin Automate – Tag First Degree Connections
Tag Linkedin First Degree Connections Uploaded From List –View Video
With linkedin automation tool you can also segment your first degree connections and segregate them easily using Linkedin tags.This feature allows you to upload a list of first degree connections ( list of their linkedin ids ) and put one or more tags on them automatically.